Raspberry Pi
- 3 mins1-Wire Bus
-
实验中使用的传感器是DS18B20,不能接反否则会迅速发热烫手甚至烧坏器件;
-
使用1-wire总线需要先进入 raspi-config ,在 interfacing options 里面enable 1-wire(SSH、SPI、I2C、VNC等都采用同样的方式设置,都可利用lsmod检查);
-
利用 lsmod 检查 w1-gpio 模块和 w1-therm 模块是否存在,若没有则:
sudo modprobe w1-gpio
sudo modprobe w1-therm
-
进入 /sys/bus/w1/devices 目录,可以看到文件夹 w1_bus_master1 和 28-* , cat 28-*/w1_slave 可以读到温度数据;
-
如果 ls 没有任何结果,则可能是内核版本问题,需要修改 /boot/config.txt 文件,在末尾添加:
dtoverlay=w1-gpio-pullup, gpioin=4
DATE: 2018-03-29
树莓派中文环境配置
参考文献:http://shumeipai.nxez.com/2016/03/13/how-to-make-raspberry-pi-display-chinese.html
- scim中文输入法:
-
安装中文字体:
sudo apt-get install ttf-wqy-zenhei
-
安装中文输入法:
sudo apt-get install scim-pinyin
-
修改树莓派配置:
sudo raspi-config
在change_locale中选择zh_CN.UTF-8
-
重启后即可
DATE: 2018-03-30
- 另一种安装fcitx输入法及google拼音支持的方法(现在自己都是用的这种方法,沉迷google不能自拔…)
-
安装fcitx输入法:
sudo apt-get install fcitx
-
下载google拼音支持:
sudo apt-get install fcitx-googlepinyin
修改用户密码
参考文献:https://blog.csdn.net/guanmaoming/article/details/78760428
-
修改pi用户密码
sudo passwd pi
-
修改root用户密码
sudo passwd root
-
用户切换
su root
su pi
修改镜像源
参考文献:https://blog.csdn.net/la9998372/article/details/77886806
-
使用管理员权限编辑
/etc/apt/sources.list文件:sudo vim /etc/apt/sources.list
-
#注释掉原来的内容,写入以下内容:deb http://mirrors.tuna.tsinghua.edu.cn/raspbian/raspbian/ stretch main contrib non-free rpi deb-src http://mirrors.tuna.tsinghua.edu.cn/raspbian/raspbian/ stretch main contrib non-free rpi -
使用管理员权限编辑
/etc/apt/sources.list.d/raspi.list文件:sudo vim /etc/apt/sources.list.d/raspi.list
-
#注释掉原来的内容,写入以下内容:deb http://mirror.tuna.tsinghua.edu.cn/raspberrypi/ stretch main ui deb-src http://mirror.tuna.tsinghua.edu.cn/raspberrypi/ stretch main ui -
更新软件源列表:
sudo apt-get update
需要安装的包
- vim
- lftp
- curl
- ctags
DATE: 2018-05-22
python包安装:pip install [package]
python帮助文档:pydoc [package]
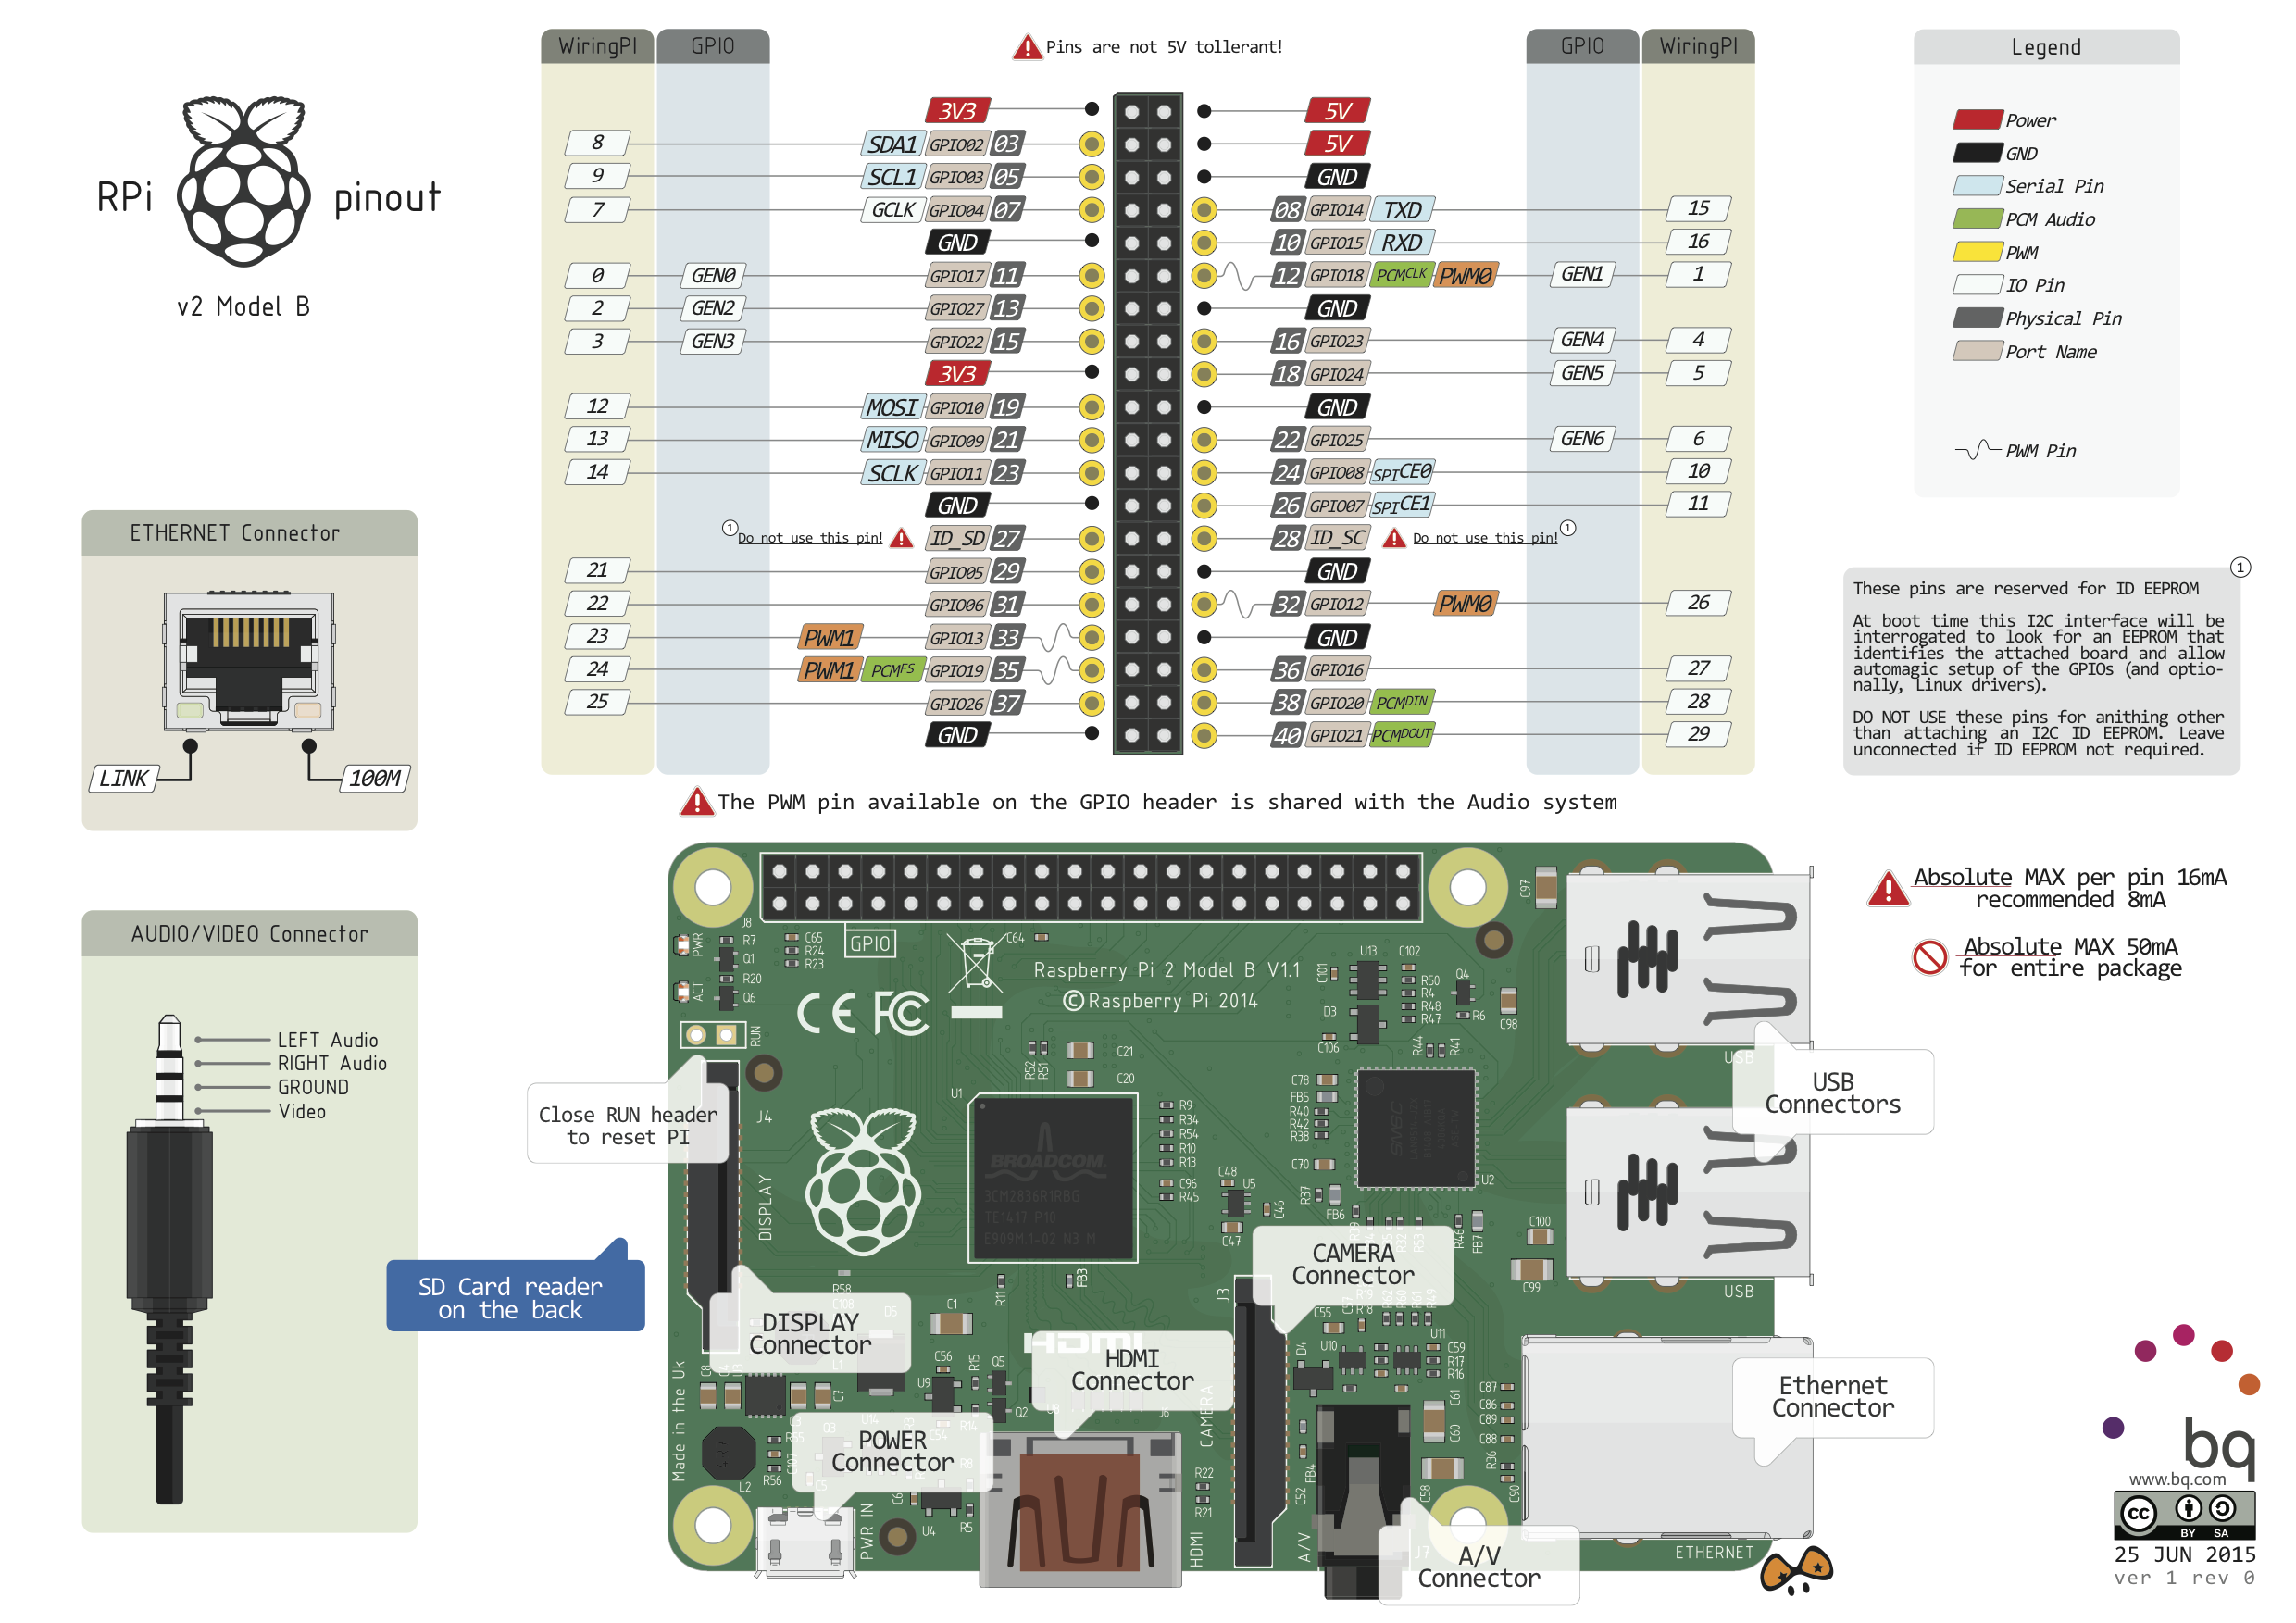
RPi.GPIO
参考文献:RPi.GPIO的wiki:https://sourceforge.net/p/raspberry-gpio-python/wiki/Home/
图片来源:RPi.Pinout:https://blog.csdn.net/coder9999/article/details/76904625
Demo Code
Instructions List
- ([] means it depends on your settings, / means those are options, {} means it is optional)
- GPIO.setmode([mode])
- GPIO.getmode()
- GPIO.setwarnings(False)
- GPIO.setup([channel/chan_list], GPIO.IN/GPIO.OUT, {initial=GPIO.HIGH})
- GPIO.input([channel])
- GPIO.output([channel/chan_list], [state])
- GPIO.cleanup(), GPIO.cleanup([channel/chan_list])
- GPIO.RPI_INFO, GPIO.VERSION() (refer to wiki)
Importing the module
# To import the RPi.GPIO module:
import RPi.GPIO as GPIO

# To import the module and check to see if it is successful:
try:
    import RPi.GPIO as GPIO
except RuntimeError:
    print("Error importing RPi.GPIO!  This is probably because you need superuser privileges.  You can achieve this by using 'sudo' to run your script")
Pin numbering
# To set the numbering system:
GPIO.setmode(GPIO.BOARD)
GPIO.setmode(GPIO.BCM)

# To detect the numbering system:
mode = GPIO.getmode()
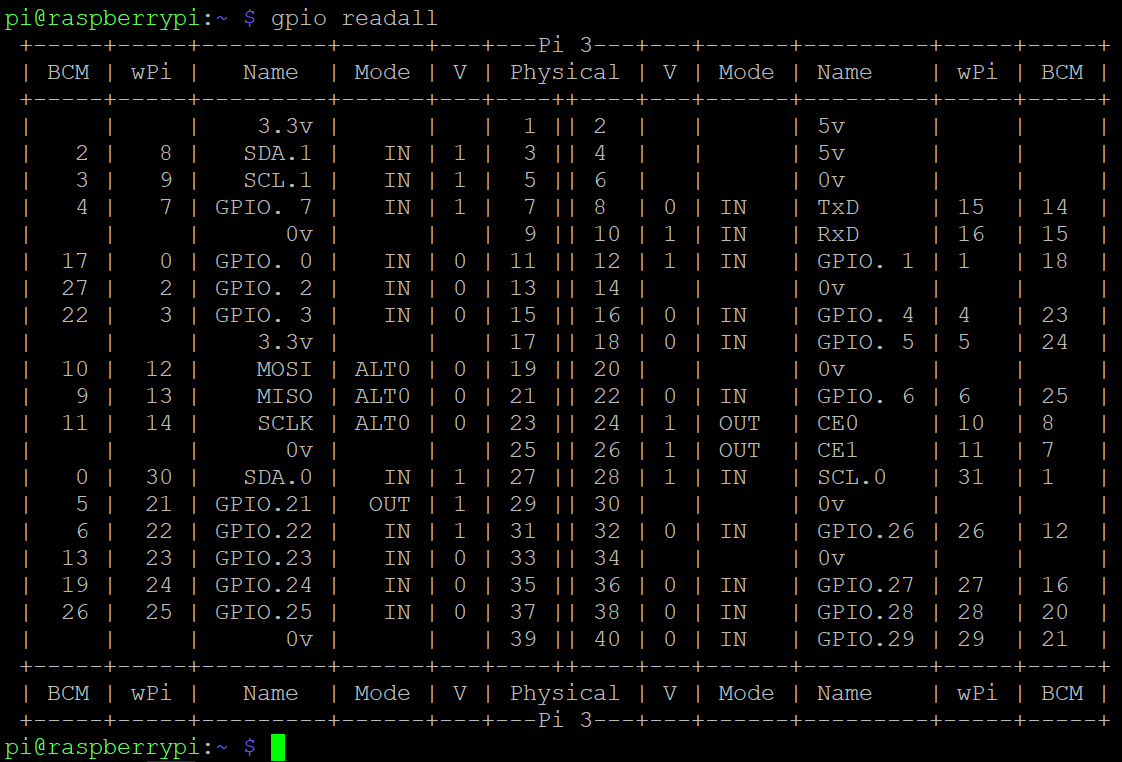
If you are confused about the numbers of these systems, you can use gpio readall in terminal to show it like this:
Warnings
# To disable warnings while more than one script/circuit on the GPIO of RPi:
GPIO.setwarnings(False)
Setup channel(s)
# [channel] depends on the numbering system you choose

# To configure a channel as an input:
GPIO.setup([channel], GPIO.IN)

# To set up a channel as an output:
GPIO.setup([channel], GPIO.OUT)

# Specify an initial value of output channel:
GPIO.setup([channel], GPIO.OUT, initial=GPIO.HIGH)

# Set up more than one channel per call:
chan_list = [11, 12]  # You can tuples instead
GPIO.setup(chan_list, GPIO.OUT)
Input & Output
# To read the value of a GPIO pin:
GPIO.input([channel])

# TO set the output state of a GPIO pin:
GPIO.output([channel], [state])

# State can be 0/GPIO.LOW/False or 1/GPIO.HIGH/True

# Output to several channels
chan_list = [11, 12]
GPIO.output(chan_list, GPIO.LOW)  # Set all to GPIO.LOW
GPIO.output(chan_list, (GPIO.HIGH, GPIO.LOW))  # Set first HIGH and second LOW
Cleanup
# It is good practice to clean up any resources you might have used. By returning all channels you have used back to inputs with no pull up/down, you can avoid accidental damage to your RPi by shorting out the pins. Note that this will only clean up GPIO channels that your script has used. Note that GPIO.cleanup() also clears the pin numbering system in use.
# To clean up channels you used at the end of script:
GPIO.cleanup()

# Clean up individual channels, a list or a tuple of channels:
GPIO.cleanup([channel])
GPIO.cleanup((channel1, channel2))
GPIO.cleanup([channel1, channel2])

Kaixin Yang
做你该做的事情,并接受它的事与愿违